How Do I Change My Home Water Filter?

If you have a home water filtration system, it’s important to change out the water filter cartridge before it gets clogged. For many people, the question of how to change a home water filter leaves them scratching their heads. Sometimes, it’s just easier to call a professional to do the job quickly and easily — but if you want to give it a try, we’ve got the answers.
Why Do Water Filters Need to Be Changed?
Water filters work by removing impurities, such as sediment from the water that passes through. This process works because the filter in the unit is fine enough to let water pass through while it traps sediment and other undesirable particles.
But over time, the filter accumulates sediment and particles, and it becomes clogged, and the water flow rate slows down. Changing the filter periodically ensures that your home water filtration system continues working as efficiently and effectively as it did when it was new.
How Often Do You Need to Change Your Water Filter?
There are lots of different water filtration systems available on the market. Some are suitable for at-home use only, while others have been designed for commercial and industrial use. Regardless of the kind of home water filter you use, the filter itself will need to be replaced at regular intervals..
How long a filter cartridge lasts depends on the kind of water filter system you have at home as well as the water quality in your area. Check the manufacturer’s instructions for a recommendation on how often to change the filter in your specific system.
The lifespan of a water filter cartridge also depends on how much you use your water filter. In a small household of two or three people, the cartridge will last longer than it would in a larger household with four or five people.
If your water filter manufacturer recommends changing the filter cartridge every six months, this means that six months is the maximum amount of time to wait before changing the cartridge. In a larger or heavy-use household, you may need to change the cartridge sooner.
As a general rule, change your water filter cartridge according to the manufacturer’s instructions or sooner if you notice that water flow is reduced.
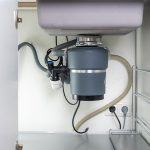
How to Change an Under-Sink Home Water Filter
Tools you’ll need for this job include the filter wrench that came with your filter, a flat plastic or metal tray, and a new cartridge for your water filter. You may also need filter O-rings and a silicone-based lubricant.
Get a bucket full of hot soapy water ready so if you need to clean the filter casing, you’ll be able to do so easily without having to turn the water back on.
Step 1: Shut off the Water Supply
Before you get started changing the filter, you’ll need to shut off the water supply to the filtration unit. If you skip this step, you risk flooding your entire kitchen, so make sure to do this first.
The water inlet valve for the filtration unit is probably located near the back of the cabinet and will have a shut off valve connected to the incoming water line. Once you’ve found the valve, rotate it so that it is horizontal to the supply line.
Note: If your water filter doesn’t have a water inlet valve, or you’re unable to close the valve, you’ll need to turn your water supply off at the home’s main supply to prevent flooding. For most homes in North Dallas, the water main is in the front yard.
Step 2: Release the Water Pressure
Certain parts of your water filter are pressurized, which can make opening it up more difficult than it needs to be. To release the pressure, turn on the sink faucet and run the water until you see a drop in water flow and pressure.
Step 3: Remove the Filter Casing

Place the plastic tray underneath the filter to catch any water that spills out as you loosen the filter casing.
Next, slide the filter wrench over the filter casing. Twist the wrench to the left to loosen the casing. Remove the wrench, then continue twisting the casing until it comes free.
Note: If you have a hard time loosening the casing, it’s probably still pressurized. If this happens, turn on the faucet again.
Step 4: Prepare the New Filter
Once the casing is free, remove it from under the bench to remove the old filter cartridge. It should lift right out.
Check the O-rings inside the casing.
Clean the filter casing if it’s looking dirty or if you notice any traces of mold or mildew. Use hot soapy water and a bottle brush for the best results. Let it dry before proceeding.
Replace the O-rings in the casing once it’s completely dry. If any O-rings are worn, hard, or broken, exchange them for new ones. If you insert a new O-ring, coat it with a silicone-based lubricant.
Finally, place the new filter cartridge inside the casing.
Note: Do not use soaps or detergents to clean the O-rings, as these can degrade or dry out the rubber over time.
Step 5: Reattach the Casing
Take the casing and reattach it under the sink by screwing it clockwise into the top of the filtration unit. Once it’s attached, use the filter wrench to tighten the casing. To do this, slide the wrench over the casing, then twist it to the right.
Note: If the casing isn’t screwing on easily, don’t force it. Take it off and check inside to make sure that the filter is seated the right way and in the right direction and that the O-rings are seated correctly. Once you’re sure everything’s in the right place, try again.
Step 6: Turn on the Water
Reverse the steps you took to cut off the water supply to the filter unit. Then check the filter and make sure it’s not leaking. If you see any water dripping from the filter, take the filter wrench and tighten the casing a little more.
Note: If you tighten the casing and the leaking continues, it’s likely to be an O-ring problem. Either one of the O-rings isn’t seated correctly, or it may be that one of the O-rings needs replacing.
How to Change a Whole-House Home Water Filter
Before you start, make sure you have the following items: Filter wrench, filter O-rings, silicone-based lubricant, plastic tray or bucket, and a replacement filter cartridge. A bucket full of hot soapy water is useful if you need to clean the filter casing.

Step 1: Shut off the Water Supply
To change your whole-house water filter system, first shut off the water supply to the filter. There are two ways to do this, depending on what type of filtration system you have installed.
Isolate Your Water Filter
Most modern whole-house water filtration systems have intake and outlet valves that let you isolate your water filtration system from the rest of your home’s water system.
How to do this:
- Shut off the water intake valve on the water filter.
- Shut off the water outlet valve on the water filter.
Note: Most valves are opened and closed with handles that rotate 90 degrees. When the handle is at a right angle relative to the pipe, the valve is shut. When the handle lies parallel to the pipe, the valve is open.
If your system has round knobs or handles, then “lefty-loosey, righty-tighty” applies.
Turn the Water off at the Main Supply
If you can’t isolate your water filter, you’ll need to turn your water off at the home’s water box or meter boxes. Locate your home’s water main. For most houses in North Dallas, the water shut off is located in the front yard in the front flower bed, and the city main is in the front easement. If you live in a condo or apartment, check with your maintenance person, manager, or HOA to find out where your water shutoff is located. In some condos, townhomes, and apartments, water mains may be shared with several units, and they must receive proper notification before water is shut off in adjoining units.
Step 2: Release the Pressure
Depressurize your water filter by turning on a nearby faucet. Let it run until the flow rate and water pressure reduce significantly.
Step 3: Open Up the Filter Casing
Place the tray or bucket underneath the filter casing so it can catch any water that comes out.
To open the filter casing, slide your filter wrench over the casing. Twist the wrench to the left to loosen the casing. Once the casing is loose, you can remove the wrench. Then, simply twist to unscrew the casing the rest of the way.
Note: If the filter wrench isn’t working, the system is probably still pressurized. To avoid this, make sure not to skip step 2! Some home water filtration systems have a button on top of the casing that depressurizes the system for you.
Step 4: Prepare the New Filter

Once the casing is free, remove the old filter cartridge. It should lift right out.
Check the O-rings inside the casing.
- Look at where the O-rings are situated before you take them out, so you can make sure to put them back in the right places later on.
- There will be either one or two O-rings in the casing. Some filters have one o-ring at the top of the casing. Some have two O-rings, one placed below the filter cartridge and one above it.
- Remove the O-rings and check them for signs of wear. They’ll need to be replaced if they are hardened, worn, or broken.
Clean the filter casing if you notice any dirt, mold, or mildew. Use hot soapy water and a bottle brush and let it dry before proceeding.
Once the casing is completely dry, lubricate the O-rings with a silicone-based lubricant and place them in the casing.
Finally, place the new filter cartridge inside the casing. Make sure it’s positioned in the correct orientation and centered in the middle of the casing.
Note: Don’t use soap or detergent to clean the O-rings, as these can dry out and degrade the rubber over time.
Step 5: Reattach the Casing
Reattach the casing by screwing it clockwise into the top of the filtration unit. Once it’s attached, use the filter wrench to tighten it.
Don’t over-tighten the casing, as you risk damaging it. If it’s not screwing on easily, remove it and check inside that everything is seated correctly, then try again.
Step 6: Turn on the Water Supply
Once the casing is reattached, you’re ready to turn the water back on. It’s best to do this gradually, as if the casing is leaking, fully opening the pipes may result in a big mess.
To turn on the water supply, just reverse the steps you took to turn it off. If there’s any leakage, turn off the water and tighten the casing before trying again. If the leaking isn’t resolved, open up the casing and verify that all of the components are seated correctly before trying again.
Need Help With Your Home Water Filter? Call CW Service Pros Today
If everything goes according to plan, changing your home water filter can be a straightforward job, but if problems do arise, the professional technicians at CW Service Pros are here for you! They are happy to help with any water filter issues, including installation and repair, as well as filter changes and other maintenance jobs. For all your home water filter needs, call today.